Dwell By Cheryl Photobucket Portfolio Design Services Contact

"Cataloged Inspiration"

I get inspiration from all sorts of places, but there is something so appealing about well-designed and photographed pages that just lure me in.  I can literally spend hours flipping through the pages of design magazines and apps like Houzz, looking at the beautiful spaces.  I have a really hard time getting rid of the paper catalogs sometimes because it seems as if every time I look through them I see something new.  Such was the case with the Spring Williams-Sonoma Home catalog.  I've looked at it at least a dozen times and I'm obsessed with the products and spaces.    


For example,  I could seriously jump into any of these pages and live happily ever after. 

Williams-Sonoma Home


Williams-Sonoma Home
 Williams-Sonoma Home
When I peruse design magazines and catalogs, I'm always looking for things I can duplicate on a budget.  Here are a few things that caught my eye in this space.


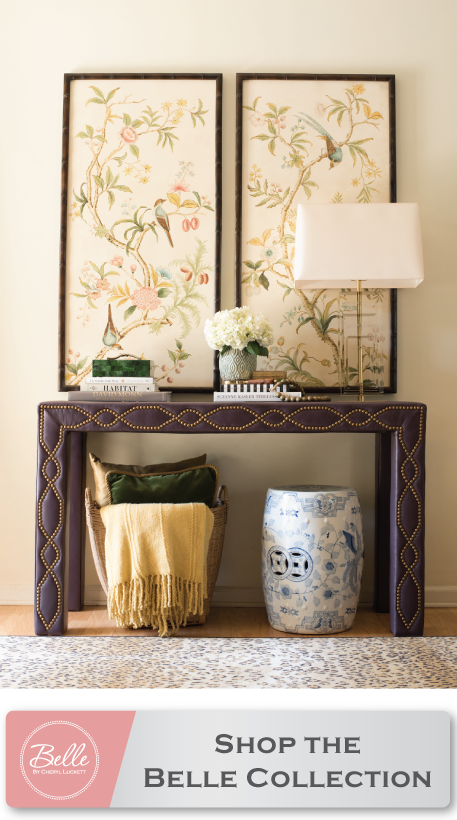
1.  The ceramic garden stool. I love it as a side table.  I picked up the one I have on a sidewalk sale at Kirkland's last fall.  It was leftover from Spring/Summer and at $20, I'm kicking myself for not buying multiples. 

2. I love the HUGE Fiddle Leaf fig.  I blogged about them HERE.

3.  Do I even need to note how much I love the clean lines of the sofa above?  It almost makes me wish I'd gone tufted on my recent sofa makeover

4.  The flood light rocks.  It definitely puts me in mind of the pharmacy lamp I recently added to my living room.

5.  I always keep my eyes open for small metal tables when I'm out thrifting.  So cute and functional. 


In this space, I love the neutral color palette. I'm actually pulling something together for a current client that's very similar.  However, a closer look reveals a few other things beyond the color.

1.  It dawned on me that the shades on the lovely glass lamps aren't drum shades.  Is the trend changing?  Hmmm...

2.  I love that the magazines are just stacked neatly in a simple tray/basket.  This is a perfect solution for those of us who have tons of them. 


3.  The large mirror looks casual yet dramatic leaning against the wall with art layered in front of it.

Lastly, the color scheme in this space is my favorite, but I also noticed a couple other of things.
1.  The vignette on top of the secretary is so well put together.  I study things like that in photos.  I love the three different decorative items grouped together and again how the art is simply leaning instead of hung. 
2. Because I'm a thrifter at heart, I couldn't help but notice the simple (almost country) chair featured in the photo. There's nothing extra special about it, but it looks so graceful in the environment that it's in.  How many times have I passed a similar chair on one of my thrift outings? 
The bottom line is that you may need to give those catalogs and magazines a second (third, and fourth) look.  Remember, the (design) eye is a muscle; The more you use it, the stronger it gets. 

Have you subscribed to the Dwell by Cheryl blog?
Enter your email address:


Delivered by FeedBurner

"Repurposed Candle Jars"

 
If you're like me, you enjoy the scent and warm glow of a scented candle in your home.  I have them in almost every room.  Nothing says welcome home like a yummy candle burning.


Bath and Body Works

But because I like candles so very much, I'm often left with candle jars with a smidgen of wax remaining in them.  For years I've just tossed them away.  Sure, I may have thought, "I should collect this leftover wax, buy some extra wicks and make a new candle."  But really, was I ever going to actually do that?  Not likely.  Then one day while reading one of my favorite blogs, I was inspired to reuse the containers.  We know how much I love gardening and cut flowers, these candle jars would make great vessels for my backyard blooms!


It's super easy too! 

1.  Place the candle jar into a pot of water.
 

2.  Bring water to a boil.  The remaining candle wax will melt and can easily be discarded in the trash can.  (Note:  Do NOT microwave, as the wick bases are metal)


3.  Remove the wax residue with a Brillo pad and wipe clean.  A run though the dishwasher leaves the jar gleaming.


4.  Fill the jar with your favorite flowers.  


Candles come in varying sizes and I've found uses for all of them. 
 

"Rug Sale Alert!!"


I don't usually post on the weekend, but there's a sale going on that's too good to pass up.  Rugs USA, one of my favorite sources for affordable and modern rugs, is having a HUGE Sample Sale.  They provided the very first Dwell by Cheryl giveaway and I'm forever grateful.  So, although they're not paying me to post this, because I really like them, I thought I'd share.

The sale runs for four days and the savings amount to 80% off retail pricing!  I've curated a few of my favorites. 


1. Serendipity Rug $136       2. Rust Rug $131        3. Revive Sand Rug $48      4. Brown Rug $146 
5. Navy Rug $86        6. Sand Rug $90
 
The style and size selection is great, but I'm imagining that these won't last long.  So, if you're in need of a new rug, now would be a great time to snatch one up.  Added bonus:  Rugs USA has free shipping.  Love that!  Have a great weekend!!
 
Not following the blog yet?  Get emails delivered to your inbox and miss out no more!
 
 
Enter your email address:


Delivered by FeedBurner

"Blogging Over at Restore!"

A few weeks ago I mentioned that I had been asked to be one of four regular contributing bloggers for Habitat for Humanity Restores in the Charlotte Metro area.  I'm so excited to announce that the blog launched yesterday and my first guest blog has been posted. 

You can click HERE or the icon below to check it out. 


The blog post highlights one of my favorite finds from a recent trip to the Restore nearest me.  It also includes an item that I'm selling that I think you'll like. 


Interested? Find out more HERE.

Be sure to leave me a shout out over on their blog.  Make it a great day!!
 

"Gardening Day 2013"

This past weekend was a super productive one.  I got all sorts of projects completed, and while it was exhausting, it was also super rewarding.
 
Each year I take off a day of work for sun up to sun down gardening.  We'll this year, I couldn't seem to get an entire day so I settled for a half day.  Unfortunately, the weather didn't cooperate so I ended up Painting the Pantry instead.  Of course, that meant that Saturday was a busy day.
 
Click to Enlarge

Unlike most gardening days, this year  I was more focused on clearing out and cleaning up than planting.  The backyard, was looking looking a mess!
 
After half a day of cutting back, pulling weeds and assessing what I needed, I made a trip to my favorite nursery. 


It's my go-to spot for plants that I KNOW will do well in my area.  I stop at the local nursery first and then feel in with plants from the big box stores.  Let's just say it was a fruitful trip.


The second day was spent doing all of the fun stuff; planting, arranging and decorating.  Here's the result.... 


I'm still in need of a new outdoor rug, but I'm holding out for the perfect one. 


The Plants

There are certain flowers that I buy each year.  I'm a sucker for a Gerber Daisy.  So bright and cheery, they're hard not to love.  They also make for great cut flowers.
 
 
I saw this stunning Bougainvillea and just couldn't resist.  The fuchsia color is gorgeous and they happened to love the sun and don't mind drying out before being watered.  That's my kind of flower.
 

The azaleas that I planted a couple of years ago are just lovely.  This is the first year that they've been this full and pretty.
 
 
At Bonnie's recommendation, I added some shade loving plants to the porch. I must admit I'm not really a foliage girl, but it's worth a try.  Who knows, by the end of the Summer maybe I'll be a convert.
 
 
And of course, it's not gardening day if you don't actually pant a "garden".
 
 
I still have a few thing to do, but all in all, I'm pleased with the result.   
 
Click to Enlarge
 
Lemonade anyone?
 
P.S. You can read about last year's Gardening Day HERE.

"My Painted Pantry"

Last week was Sherwin-Williams' National Painting Week. 
 
While I didn't get a chance to make it to Sherwin-Williams, by Friday I had the burning desire to paint something.  There is absolutely nothing like paint to completely transform a space with a few strokes of a brush and very little investment. 
 
Since the rain completely screwed up my original plan for Friday afternoon gardening (more on that later this week), I decided to tackle an indoor project instead.  A quick visit to Lowe's and a stop by the "oops" paint shelf (It's the place where they stash all of the returned paints and sell them for a fraction of the original cost) yielded a quart of super fun aqua paint for $5.00.  Jackpot! 


Now, here comes the scary part.  To say that my pantry is a mess is a gross understatement.  It looks like the grocery store exploded, like it was hit by a category 5 hurricane.  Seriously.  I can't believe I'm even showing you before pictures.   


Told you it was bad.  Anyway, after removing the contents and throwing away all of the expired inventory,  I really wasn't left with all that much.


I had been thinking about painting the pantry for a while.  I figured maybe if it were "pretty" I would be more likely to keep it organized.  True or not, it was worth a try. 

After taking out the wire shelves, I realized that the brackets weren't nearly as easy to remove. I decided that it would be much easier to just tape them off and paint around them.

 
Since this was really an organizing project, I decided to call in reinforcement.  My friend Jennifer, of Pure and Simple Organizing made a number of recommendations.  First, she said that those wire shelves were a nightmare.  She suggested that I line them with cardboard. Now, because she's function and I'm fancy, I took that suggestion and crafted a similar (more fancy) option with blank canvas, leftover drapery fabric and spray adhesive. 


Simple enough.  I actually only made two liners since I knew I'd be storing more boxes than bottles on the top two shelves.


Jennifer also recommended that I NOT buy any organizational products (i.e. bins, containers, etc), until I had finished the project.  This would allow me accurately assess what I really need.  At her advice, I didn't go out to purchase anything until I knew what I needed. 
 
 
A late night run to Goodwill yielded three baskets that were prefect for storing loose items, at only $5.00 for all three!


I love the result. It makes me happy every time I open the door.  I also love that while the color scheme is bright and fun. It still ties in with my kitchen décor.
 

And there you have it.  A quick (four hours), cost effective ($10 plus tax) and easy way to update
your pantry or storage space.


P.S. Jennifer also recommended that I relocate my brooms/mop. They were making a bad situation worse.  Why didn't I think of that?  Thanks Jennifer!!!

Gardening Guest Post: "Go-to Plants for Spring"

According to the Farmers’ Almanac this week began the “The most fruitful days” to plant. However, how many of us actually want to wait until after April 16th to put in Spring flowers when the weather has been as gorgeous as it’s been lately? Me either! 

Cheryl asked me to share my “go to” spring plants. So I really racked my brain trying to come up with something fabulous, but…..brain block. So this past weekend as I was getting ready to put my spring plants in the ground (I know Mr. Farmer’s Almanac….non-fruitful days), I thought why wouldn’t I share what I’ve chosen. You see we moved into a home that had been vacant for 5 years, so last spring we spent cleaning up the yard, this year I was super excited to start putting down my foundation. Then it clicked; my “go to” spring plants is exactly what I was planning to plant. While they may not be extremely exciting or fabulous, they are beautiful and pack a punch alone or paired with other plants. So here goes:

#1: I’m a foliage girl! To me it’s beautiful and low maintenance. It looks beautiful in pots, the ground, cut in a vase, etc. Just think outside the box and look for the beauty in foliage. Hostas! They come back each year, spread like crazy, and are pretty much care free. Just a quick Pinterest search brought up the following examples: I’m doing the one in the galvanize bucket!

via here, here and BHG

#2: Next foliage choice would be Caladiums for the very same reason as Hostas – BEAUTIFUL. Now depending on your climate these can be perennials or annuals. You can dig them up and store the bulbs for the next year.

via here, here and here

Not going to bore you with just the foliage so … here are my flowering choices.
#3: Superbells. This year I went with the Lemon Slice Superbell. Million Bells and Super Bells come in several colors. They like sun, not to be too wet, and prefer living in a pot. Boy are the eye catching! Google resulted this image....

via

#4: Next on my flowering list is Mandevilla. This is a tropical style plant that likes the sun and has always been really easy for me to grow. They are annuals, but they can be overwintered if you’re up to it. Typical colors are pink, red, and white. This year I went with white.


via


via

#5: Lastly, my absolute favorite requires a bit more patience. It is typically bought in bulb form and requires a few years before they become blooming beauties. They come in different blooms, colors, and fragrances. But they are hands down the Queen of the Garden in my opinion; the Peony.  Cheryl blogged about it last year HERE. All you have to do in put them in the ground in a sunny place and let ‘em go!


via


via

Regardless of what you choose to plant this year, just remember to check the Plant Zone Map for your area and stick to flowers that grow well for your zone. When in doubt check your local USDA Cooperative Extension for your plant questions. 

Happy planting!

Bonnie

You can read Bonnie's post from last year HERE. Great tips!!

"Read Today! I Need Your Help"

Green Jeans Consignment Style Challenge


Tuesday, I had a chance to compete in the Green Jeans Consignment Style Challenge.  It was so much fun.   


I arrived with only a few minutes to spare and came straight in from work. Upon my arrival, I met the two other challengers Jamie and GiGi.  They were super sweet, but I have to admit I'm a bit competitive so I saved the fraternizing until afterwards.  : ) Who knew I was such a competitor?


The time keeper gave the one hour countdown and we were off.  Based on my last post, I'd pretty much already decided to go with a Nautical ensemble for the Lunch on the Lake themed look. 

I scoured the aisles for about 15 minutes picking out denim, blue and white stripe, red, seersucker and khaki pieces that I thought might work.  I piled the dressing room rack full with possible options.


Of course being the decisive person that I am, I ended up wearing the very first outfit I tried on and never even looked at the other items.  When you know, you just know.  The J Crew jacket that was actually used on a mannequin was the inspiration piece for the entire look.  I just about ripped it off because I knew it was perfect.


If you follow me on Instagram, you probably saw this sneak peek that I posted from the dressing room.  I sent a quick text to my sisters to make sure they approved...


And then I proceeded to tally my items.  My head to toe look could be no more than $100.  My total?  $97, that is until I added a second $3.00 bracelet.  I wasn't leaving anything on the table. 

So, here's my head to toe look for exactly $100 and in 1 hour!


Would you meet for lunch on the lake in this?

Now, all I need you to do is VOTE! 

You must be on Facebook to cast your vote and all you need do is click

Just leave a comment indicating look #3.  Be sure to comment under the Style Challenge Pic that includes all three looks.  It's pretty simple.


YOU MUST CAST YOUR VOTE BY WEDNESDAY AT 3:00 P.M. EST. DON'T FORGET!!!
If you're in the area, you should definitely check out the sale.  It's awesome!!! 

Related Posts Plugin for WordPress, Blogger...